With the reel bundle gone, we can begin the tear-down in earnest. Let’s take a look.
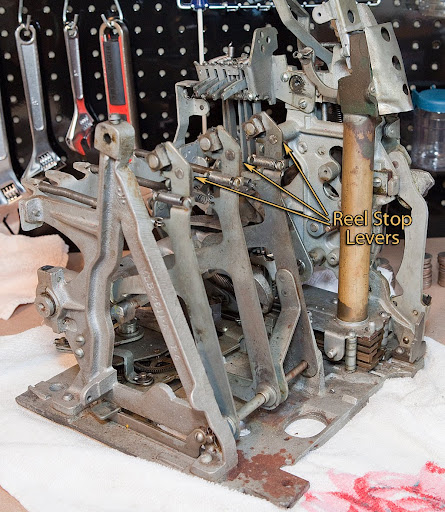
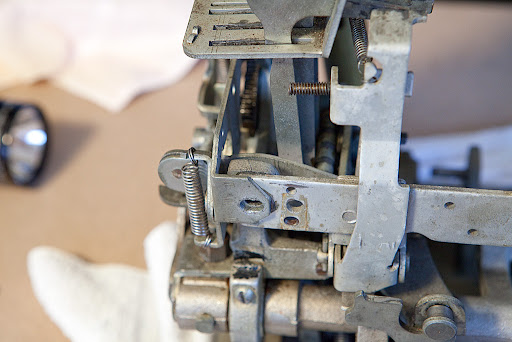
We’ll start with the reel stop levers. We need to get the levers out of the way, then remove them. The first step is to disconnect the reel stop lever springs. The springs are easy to find… they are the long springs attached to each of the reel stop levers that connect them to the back of the mechanism. As with most springs in the machine, one end will be threaded through a hole and the other end will be looped around some sort of post or ear. Generally it is a good idea to slip the spring off of the ear and leave it connected to the part where it is threaded through a hole.
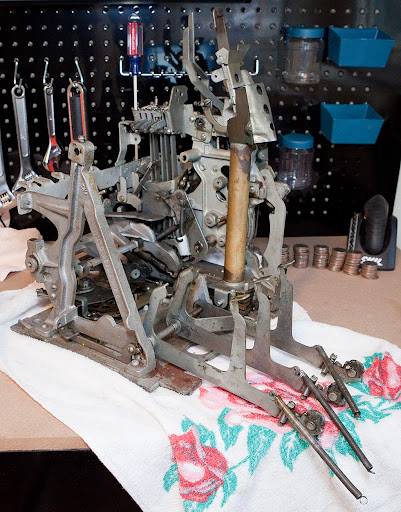
After the springs are disconnected from the back bracket, you can lay the reel stop levers down as shown above. Now we need to remove the levers themselves by removing the shaft at the bottom of the levers. This is a pretty simple matter, although the shaft is sometimes difficult to remove due to the accumulation of dirt and hardened oil/grease.
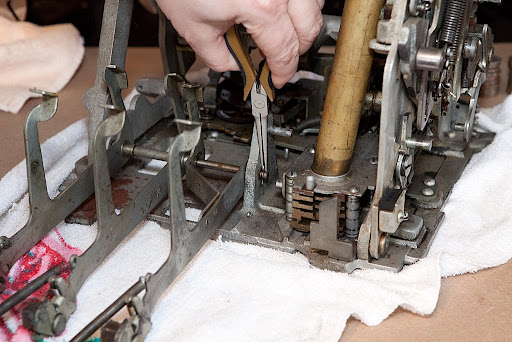
Depending on the machine, this shaft is usually held in place by two hairpins or cotter pins. (Regional note: I’ve noticed that people in the South tend to use the term “cotter pin” while folks in the Midwest and Northeast tend to say “cotter key”. Either way, they are the same thing.) On this particular slot machine, the shaft is held by hairpins. We only need to remove the pin pictured above, which is easily accomplished with a pair of needle nosed pliers. Be careful when removing this sort of pin since they have a tendency to shoot across the room and get lost forever if you don’t have a good grip.
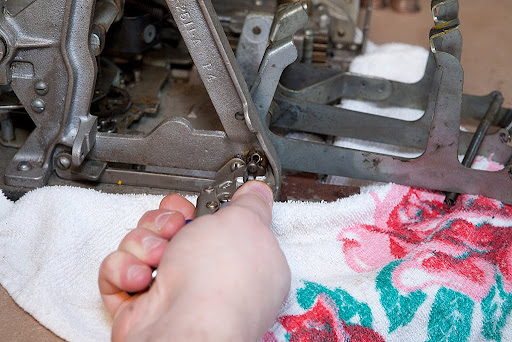
With the other pin removed, take a small pair of vice grip pliers and lock them on the end of the shaft protruding from the A-frame as pictured above. The shaft should slide straight out, although you will probably have to turn it back and forth and possibly move the reel stop levers as you are pulling.
Once the shaft has been removed, put the other hair pin back in place and store the shaft for future cleaning. As with screws, it’s good practice to put pins back in place before proceeding on.
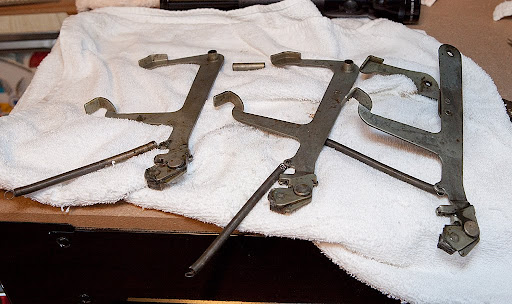
The photo above shows what the three reel stop levers look like once they have been removed. I’m going to leave the springs attached for now just to keep up with them. Note that the three levers are not identical. The one on the right (as you are looking at the front of the mechanism) has an offset and two holes where the shaft goes through the lever. The other two levers are held apart by a separate, tubular spacer that also goes on the shaft.
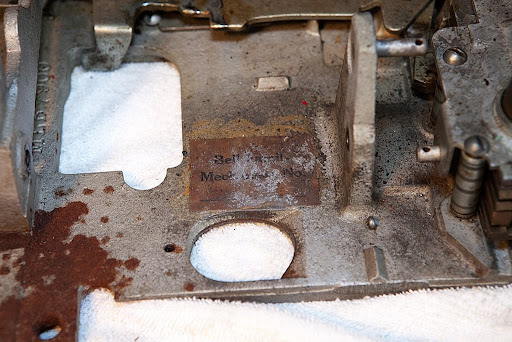
With the reel stop levers and shaft gone, we have a much clearer view of the base plate. Let’s take a close look at the label.
Unfortunately I don’t think we’re going to be able to read the serial number through all of the dirt, oil and paint. I’ll still save the label, but I really wish the serial number was readable. Oh, well… you can’t win them all.
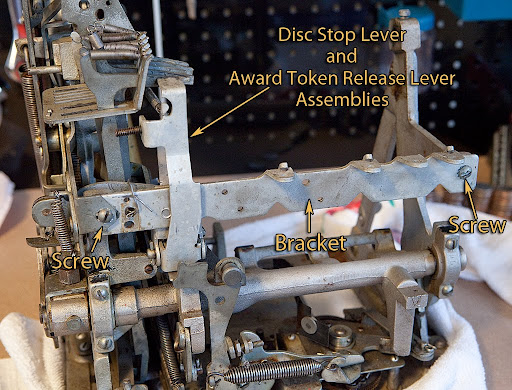
The next part we’re going to remove is the rear bracket that holds the reel brakes (if present) and the disc stop lever. It also holds the award token release lever on machines that are equipped for a gold award token dispenser. Removal is pretty straightforward since the bracket is only held on by a couple of screws. We’ll also have to disconnect a spring from the award token release lever. Before we go on, however, there’s a situation we should discuss. Let’s take a look.
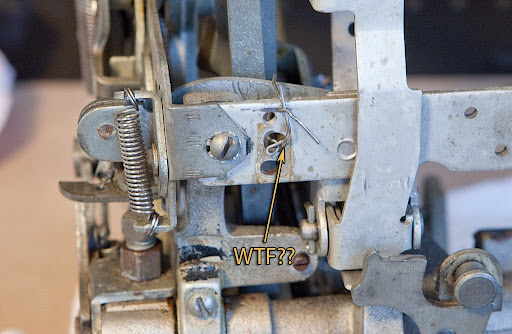
As you can see in the photo above, there is a paperclip bent around the bracket, keeping a hooked part behind the bracket stationary. Why in the world would someone do this to a slot machine? The answer is pretty simple, and this sort of “fix” is relatively common on antique Mills slot machines. The part behind the bracket is the anti-check payout hook, and its purpose is to keep the slot machine from paying out coins if someone has played a “check” instead of a coin. Checks look a lot like washers, having a hole in the middle, and were used in some locales to get around anti-gambling laws. We’ll look at this part in more detail later, but for now let me just say that this part is unnecessary for a home machine, and generally a pain to work with. The anti-check assembly has a tendency to freeze up or get sluggish, which can keep the machine from paying out correctly or at all. Some people remove this part completely, and others use a “fix” similar to the one above using bailing wire or a zip tie. For now we’ll just remove the paperclip and the other things securing the back bracket.
The photo above shows the left side of the bracket after the screw and paperclip have been removed. Note how the bracket fits in between the various parts… this will be important during reassembly.
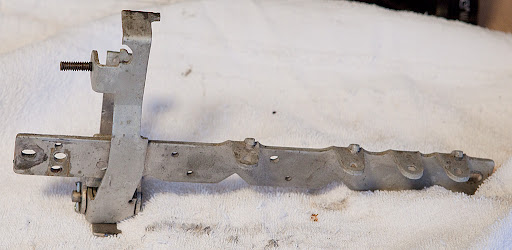
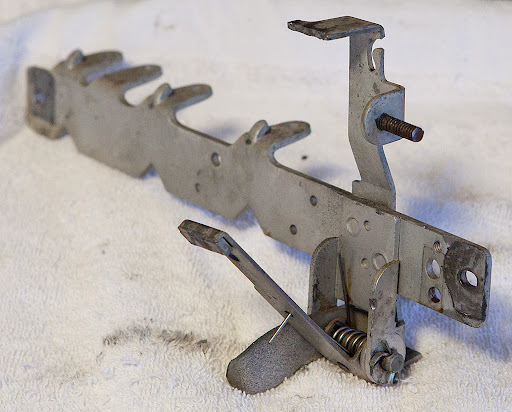
Here’s what the bracket looks like after removal. Notice that the disc stop lever and the award token release levers are still attached. We’ll remove these later when we clean this part and put them back in place before moving on. I prefer working on parts and assemblies using this sort of “modular” approach rather than disassembling absolutely everything at one time. It keeps parts together and helps you get a feel for how parts interact on the machine.
Here’s another view of the bracket and related parts. You can clearly see the disc stop lever in the foreground. This part keeps the reels from spinning backwards while the mechanism is being cocked.
Next time we’ll tackle the main operating fork and related parts.


First of all, what an incredible job you have done in your presentation. If medical books were written so clearly, I might have opted to become a neurosurgeon! Thank you for the obvious hours you have expended in putting all this together…..especially when most everyone else wants to sell you a book or CD at a ridiculous price.
I have carefully followed your instructions with no problems since you make complexities seem so easy to interpret. My machine is a Golden Nugget (repro apparently)…..but it looks almost identical to your inside. I have gotten down as far as removing the reel stop levers. The problem I’m having is identical to the “kicker” problem that you encountered. So hopefully cleaning up that area will alleviate the symptoms. But I have a question that I’m hoping you can answer. Concerning the reels, you stated that “Turning the left-most reel causes the right-most reel disc to turn. It seems backwards at first, but it makes sense when you remember where the payout fingers were located. Let’s take a look at it from a couple of other angles.” I’m wondering if this might be indicative of my problem because the left and middle reels seemed to be locked together and independent of the right wheel. Additionally, with the reel assembly in my hand, the right reel will spin freely but the left and middle do not do not turn at all. I’m hoping you might be able to give me additional information as what to do regarding same. Again, thank you for your diligence. Kindest regards, Barry
Hi, Barry, and thanks for writing.
I’m guessing that your real bundle needs to be disassembled and cleaned. It sounds like everything is gunked up (to use the technical term) and frozen. I’ll be illustrating that process in the future, but I haven’t gotten there quite yet.
Stay tuned!
this is my second posting and have read your document twice.. i now believe that the anti-check payout hook is the cause of my problems.. the machine pays out accurately a majority of the time.. but not consistently.. on 2 cherries, i might get 3 or 4 coins in the payout instead of 5, for the oranges and bells, occasionally i will get 4 coins instead of the 10 or 18 coin payout.. does this sound like my problem.. i have cleaned the slides 3 times, the last time using a little graphite on them but still have an occasional problem with consistent payouts..
blair
Blair, generally if the anti-check payout hook is the problem you will get zero-coin payouts since the hook and related assembly will keep any of the payout fingers from moving forward. It’s easy enough to tie the hook up with a zip tie or a piece of wire, so that is a simple thing you can try, but I’m guessing that you still have some sticking in your payout slides or in the horizontal fingers. I’ve never used graphite to lubricate the slides but all reliable sources say to use NO lubricant on the slides. You are probably better off cleaning them thoroughly.
The situation you are describing could have a number of causes. First, I’d make double-sure that your payout discs are lining up with your reel strips in all cases. If they are, it’s a simple matter to manually set the reels to a particular payout combination repeatedly and track the payouts. If the exact same reel positions yield different payouts on subsequent cycles, your problem likely lies elsewhere.
Does that help any?
The spring on the disc stop lever looks pretty gnarly. Is it supposed to have a lot of tension? The one on mine is very weak and I was wondering if this has anything to do with the problems I’m having. Barry
Another question. My machined did not come with the reel brake wires, but I have picked up an original set. However, I’m not sure where the wire end installs on the reels. Can you give me a hint as to where the wire installs. I got the wing nut end, just not the wire. Thanks.
Jim, the wires ride on top of a channel that you can find next to each star wheel. The wires don’t press down very hard and aren’t critical to the operation of the machine. Basically, once you have the wingnuts installed keep them very loose and play the machine. If the reels are moving too fast or stopping in a jarring sort of motion, tighten up the wingnut a bit and try again. In theory each reel should be *almost* stopped when the reel stop lever engages it.
Barry, that particular spring doesn’t usually have a lot of tension. I’m guessing you should look elsewhere for your problems.
Slotter, based on your comments, I looked inside my machine and I saw the little channels next to the reels as you described. I guess I was expecting something a bit more “elaborate”, but, in any event, I installed them and everything is working OK. Thanks for the help.
Jim
I have been given an old Mills machine it is for 3d (I’m in the UK) and is in very very bad condition compared to yours. It is wonderfull to see your pictures, but a bit disheartening as mine is so much worse. One query which you don’t seem to cover, what part of the mechanism operates the jackpot mechanism which is screwed to the front of the machine? There doesn’t seem to be any linkage between the two on yours or mine. I understand about the normal payout mechanism of fingers and coin sliders, but I don’t see how the ‘pot’ gets triggered.
Any help would be appreciated.
The part the activates the jackpot was missing on this machine when I got it. When I finally get around to reassembling it, I’ll be sure to take good photographs of the part and its installation.
Thanks for writing!
I have oiled my 31 mills war eagle slot machine but still having a problem with reels spinning,
they will spin once every 10 or so pulls, I see the kicker, it seems to be working, the reels spin freely when i pull the stopper out and the finger that go into the reels
If the reels spin freely, more oil is not the answer. Check out the section on cycling the mechanism out of the case (http://www.slotrestoration.com/2010/01/14/the-basics-cycling-a-mech-outside-the-case/) and try the following: Cycle the mech while the clock fan is blocked, either with the special part mentioned or with a screwdriver or other implement. If the reels don’t spin and coast to a stop, but will spin freely when you push them, you probably have a kicker problem.